Follow Me!

I now have my own Facebook page! Please like it at https://www.facebook.com/katjaneway.blogspot.

You can follow me on twitter also @Katjaneway. If you hate twitter, like I know a lot of you do, you can still subscribe to my blog via email below this heading. I'm also on bloglovin'!

Follow my blog with Bloglovin

Don't forget to comment, ya trolls! Thanks :)

Sunday, November 27, 2016

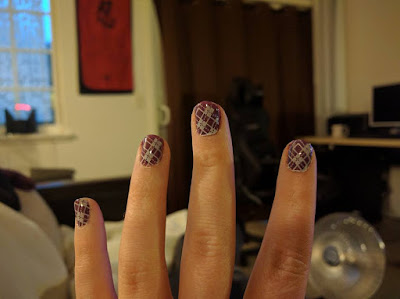
Nail Stamping

A couple people have asked me how I do my nails, so this will be my guide/tutorial on everything you need to stamp your nails and make them look pretty without spending a fortune at the salon (I don't know about you, but I don't like people messing with my nails!)


First thing first: I highly recommend OPI nail polish for all your basic needs. They go on thick and generally only need one layer. They also dry pretty darn fast! You will need a clear base coat for sure (base coats are formulated to adhere to your nail. Don't try to save money here by buying an all-in-one. The formulas are different in a base coat as opposed to a top coat.) And you can not do these stamps without a top coat because they can and will scrape off easily. 
I also like Orly nail polishes, but I prefer using them on their own because they come in a lot of wacky and cool colors. Plus they are also thin so you need more than one coat in most cases.


Here are the items you will need (I will use amazon links to make it easy but you can find a lot of this stuff cheaper elsewhere):

Stamper and Scraper - Believe it or not, not all stampers and scrapers are created equal. The scraper pictured here is my favorite. A good stamper will not be too firm and not too soft. It will need to pick up the polish well and form fit to your nail.
I also highly suggest that you "prime" your stamper with a nail file because it will help pick up more polish. The color of the stamper can be important too... if you choose white and you use a lot of white stamping polish, you're going to have a horrible time lining up your stamp when you can't see it!

"Special" nail polish - You may think you can get away with using a regular thick nail polish and you'd be wrong. Trust me, I've tried. Stamping polish is much thicker. This is the brand I use (try ebay). They are small bottles, but they will last you a long time.

Manicure plates - My favorite part! There is so much to choose from it will boggle your mind. [I have read that not all stamping plates are created equal either. Some of them are made so cheaply that the recesses etched into the plates aren't deep enough and won't produce a good stamp. I have bought $2 plates off of wish.com and have been fine, but you've been warned!] I have used the round plates before, and they certainly work, but those kinds of designs are mainly little pictures of things like flowers and butterflies. They are hard to line up perfectly. I prefer nail plates that have pictures designed to fit to your entire nail. They usually give enough room for error in case your stamp is a bit off. They also have ones that depict an entire scene and you just pick the part you like and stamp it. I find those a bit odd and haven't bothered with them.

That's it for supplies! Now for the tutorial:

After your base coat dries, paint your special polish into a plate design that you like. Make sure its in there thick; don't be stingy. Scrape off the excess - and scrape it twice (this will insure all gaps are filled with polish). Now work rapidly here - the polish is thin and will dry quickly. Use your stamp and roll it onto the plate, pressing hard. It should pick up most all of the polish. Line the stamp up with your nail as best as you can, and just like on the plate, roll it onto your nail from one side to the other in one fluid move. Its best to have your nail on the table when you do this. Between each nail, you will want to wipe off your stamp and your plate with nail polish remover (please just use acetone. It works so much better for clean up. Also don't use cotton balls for this; you will regret it. Paper towels will work just fine). And that's it! The process seems long and tedious but once you get the rhythm down it'll go quick. 


One downside to full nail stamps is the clean up around the edges. 
I have a manicure pen for this.

One last step before it's all done: the top coat. The stamped polish is pretty much immediately dry, so after you're done stamping all your nails you can paint on the top coat - but one more piece of advice: your top coat brush will literally pull the stamp with it as you apply it. My advice is to carefully and lightly dab the top coat onto your nail. Swipe it as little as possible. Once it dries, add another top coat in the normal fashion. 

All done!

There are so many options here; different stamps to try, different color combinations... the possibilities are endless and will keep you busy for a long time! Plus they look super cool, don't you think? :D

Sunday, November 20, 2016

The Great Desk Swap

This whole blog post is going to sound like one big shill, but considering I only have 20-40 readers, it is certainly not! Like Alton Brown, I only "advertise" what I personally use and find really amazing!

Now, first I have to mention that without my new Chevy Sonic Hatchback, none of this would have been possible [alone]. Not only was I able to drive to Ikea and fit two drawer unit boxes plus a 59x29 piece of table top, but I was also able to throw broken desk pieces in there to toss into the dumpster! (more on this in a minute!)

This was my old set up. The things that are inherently wrong with these kinds of desks are: 1. The one shitty "leg" on one side holding everything up. After several moves, it was close to collapsing 2. The backing board, making it nigh impossible to get anything plugged in back there 3. The whole top piece, making desk space very limited. After buying my new computer case (A Carbide 500R, btw - so freaking awesome! A++ 5 star), I could no longer fit it up top and had to put it at my feet, which created its own set of issues) and 4. See that printer waaaay up there? Yeah, if I wanted to do anything with it, I had to grab a chair.

So all of those things, plus the fact that it just looked like shit (don't ever leave duct tape on furniture like that for more than a few hours or you'll regret it) have made me want to replace this desk for a long time. But, with what?

Lifehacker to the rescue. (I told you this post would be shill-y). That link (and pic below) is my inspiration. 

The part that got me was the fact that it was built from Ikea parts, so anyone could do it. Now his is a bit different - for one, he used the white cabinets. But he also used a different top... a kitchen counter made from 100% beech wood, but is also 74" long (and $119). I definitely didn't have 74" to spare. My original plan was to go to Ikea on Saturday, pick up the cabinets, and then go with my dad on Sunday to pick up the counter top and have it cut down to 58".
But, while I was at Ikea on Saturday, I found this: Linnmon Table Top. It was almost the perfect size; 59x29 which was do-able (a bit wide, but not crazy) and only $30!! What a steal! Now, it's not 100% wood, but because I wouldn't have to cut it down, that didn't really matter.

But, before I could even build this thing, I had to put the drawer units together and tear down the old desk. And I do mean tear down literally - it was a floor model so it was glued together. I had to figure out how to rip it apart because I couldn't just take it apart, and be able to throw it all into the dumpster. 


This was by far the hardest part of the whole project. I had to pull out my reciprocating saw (something that I had just bought on a whim at a friend's garage sale not knowing if I would ever need it for anything). Again, this project would not have been possible without it! I literally had to saw through the desk to take it out in pieces!!! Look at what it did to my poor saw!

That's seriously bent, in case you can't tell

But once the old desk was out of the way (Thank you Chevy Sonic for allowing me to pile the pieces in the back and take it to the dumpster! [Which was also very difficult as the dumpster is 4' tall and you can't hold the lid open to throw anything away. Nothing can ever be easy!]) I could now put together the new one. Like my inspiration desk, I bought a cable management piece to hide all my cords and installed that. I screwed the risers into the cabinets (I bought 2" ones instead of 4" ones because I'm short), and just placed the top onto the risers. Badda-bing, badda-bang, all done. 


The table top isn't even attached to the risers... it doesn't need to be. It won't move unless you move it (I know, I couldn't believe it at first either). This is also a blessing, because now if I need to plug in something that has a brick, I can slide the table forward, drop it back there and slide it back. GENIUS. Now, I have my computer case off the floor (no more worrying about static electricity shorting out my PC on the carpet) with easy access to install hardware or plug things in. And also, my printer is accessible! 

Another thing to note besides the fact that I just about doubled my storage space and now have a blank canvas behind me for some awesome art, is the height of the desk. I spent a pretty penny on a DXRacer chair not long ago (I really wanted something that I would never have to replace. Don't judge me) but never found is as comfortable as it claimed. I still sat forward in my chair and didn't feel as though it was giving me any support. Now I know why - my desk was too low and my chair was too high. Now my keyboard is a bit high; it's something I'll have to get used to, but my monitor is the perfect height. It's actually eye level to me, and the natural way to sit in my chair now is to lean back in it, making it a ton more comfortable.

I also have to mention that despite Ikea's reputation for horrible installation directions and confusing pieces of furniture, those two drawer units were some of the easiest things I've ever put together and was easily do-able with one person. They are also very nice cabinets and well worth the cost, I think.

Total cost: $219 not including tax. Well worth it in my humble opinion! 


Sunday, November 6, 2016

I Feel Stuck

I'm not here to put blame on anyone or anything but myself, but I'm feeling very stuck in my life. The thing is, is that I don't want to change it, or I don't care to, and I'm okay with it.
But I'm watching everyone around me advance, and it gives me that stuck feeling.

I'm watching friends of mine find loves, either get married or know that they will, save up money to buy a house; some of them will have children and some of them won't, and I'm still here doing and being the same thing I've always been. And that's where I feel different... I don't want to change my situation because I don't want to necessarily be them. Not only do I not want children or care about having a stupid white picket fence; but I don't want to own a house either.

My point is, it's not that my friends' are buying houses and possibly having children, but it's that they're growing and moving and not being stagnant. 

I know I could change this situation if I wanted to. I know that I could go back to school, get out of the job I'm in (where in a couple of years I will reach my salary cap) and move up a little bit. But I won't. To be honest, I don't have the gumption to change that drastically; to get into massive debt by going to even a trade school, to get more money to pay off that debt. It doesn't seem logical to me. To use up all of my free time to sit in a hole of debt for years. I am comfortable where I am... I make enough to support myself and basically buy what I want in life. The apartment that I live in is very nice and more importantly, close to work/stuff and very secure.

I've spent almost 7 years at Franciscan, now. I've established loyalty with them, as in - fully vested. I'm putting money into their 401k, have money in their 403b (which is inactive right now), gained retirement benefits. The problem with rooting yourself in the healthcare industry as a non healthcare professional, is there are only so many options to move up. Franciscan will help you pay for school if it requires a degree, which means becoming a CNA, LPN, RN, ARNP or physician. I have no interest in this, so they'll be no help. Any school I do will be out of my own pocket.

I'm also not interested in stress. The other day I was stressed at work because Brenda called out sick and I was the only one on phones. There was no clinic, but there was a lot of stuff I had to do. My supervisor tells me that one of her people was sitting in Gig Harbor right now, answering phones and checking in 30+ people all by herself, and looked at me like I was retarded. What she doesn't understand is that stress is different for different people. I don't handle stress well because I'm never stressed. I've never had to build up a tolerance for stress. I don't have children running around my house, and animals to take care of (sans gerbils). I don't often have to make life-altering decisions, or have to deal with a vehicle that only runs half the time. And I don't believe that getting into a position where if I were to make more money - which ultimately means more stress - is for me.

Here's the truth, and if anyone I'm dating reads this, don't fret too hard because this isn't anything I'd make a life-altering decision over: It would be nice to marry into stuff. Not necessarily marry rich, but just find somebody that already has the stuff. The house, the job. The nice stuff. Of course I wouldn't choose one person over another because of stuff; I've already proven that I don't care [about that] with my past relationships. But it would just be nice. Does that make me entitled and lazy? I don't know. Maybe in another couple of years when my raises stop coming, I'll decide to change my course. But I just can't convince myself to do anything about it right now, even though everyone around me is growing. It just makes me kind of sad.